
Showing posts with label DW8. Show all posts
Showing posts with label DW8. Show all posts
Wednesday, July 8, 2015
LDV Pilot with a DW8 pug - A silent video on changing a head gasket
It is not the best tutorial (also because it's subtitled in french) but it gives you a good idea of the amount of work involved to change a head gasket on a DW8 peugeot engine.
Wednesday, December 4, 2013
Replacing the glow plugs on DW8 diesel engine
I need to replace the heat plugs of the DW8 since my van only start with a cold start spray shot if the temperature goes down or if the dampness is too much.
I had a look today but couldn't figure out how to take the air intake manifold out which is needed cause it blocks access to the plugs.
And lucky me found this from Liamautomechanic!
Thanks Liam!
replacing the glow plugs removing the inlet manifold citeron peugeot video
If i get it correctly we have to take off and disconnect:
next step is to remove the nut on top of the heater plug.
He uses a 10 socket and a small ratchet to unscrew the plugs.
hopefully i dont need that:
+++ Day 2: All went well. It took me 2 or 3 hours not counting in the time it took to find the tools (I havent got that many and they re all scattered + when I went to buy the extension for the ratchet the shop employee got the key stuck in the display's lock...). What I needed was slightly different than on the above video which is normal since my engine is on a LDV Pilot 2003 DW8 diesel non turbo. Tools used:
First unscrew the Allen head bolts. These with long arm Allen wrench:

These with the short arm smaller hex wrench

Next unscrew the air intake pipe collar with the flat screw driver.

snap open the clip-on collar of the metal pipe from the exhaust using the screwdriver too.

If you disconnect these two you can already pull out the air intake manifold that covers the engine head and prevents access to the glow plugs.
Then you can start unpluging the flexi pipes (there are 2 of them) and the electric plug. They are located close-by the air intake connection.
You can see the plug here and the red labelled flexi pipe - connected beside each other. Right behind is the third flexi pipe which connects underneath.

The third flexi pipe.

Disconnect that bigger rubber pipe at the very back of the manifold (below the electrical ringed plastic pipes on the image) using the flat screwdriver. Pop it out like the pipe from the exhaust. Same clip-on collar type.

Lastly unscrew the bolt that hold these 2 electric wires right under that rubber pipe you just took off. Use the ring spanner or deep socket one 8mm for that job.
They are disconnected on the image.

Pull out the manifold and you can now access the plugs.
Get your 7mm socket and your ratchet + extension to undo the bolts that hold the wire (sometimes a metal plate) between the plugs.

Once undone pull out the wire and change the socket to the deep 10mm one so you can get cracking on the plugs. Go carefully cause it seems they can break easily. I had no probs at all but maybe it was due to the DW40 bath?
It's appropriate to clean around the plugs before you take them out or else just make sure nothing gets in their hole when taken out and when placing in the new ones. A reasonable amount of grease on the thread of the new ones is probably a good idea too.
The old ones on mine looked like that:


No wonder why the engine wouldn't start as soon as the temperature would go down...
Once you re done with the new ones, go all the way backwards:
that should tighten up everything.
If you did it correctly and hopefully this was just maintenance, the engine will start up right away as mine did.
I had a look today but couldn't figure out how to take the air intake manifold out which is needed cause it blocks access to the plugs.
And lucky me found this from Liamautomechanic!
Thanks Liam!
replacing the glow plugs removing the inlet manifold citeron peugeot video
If i get it correctly we have to take off and disconnect:
- 4 bolts (HEX wrench/ alen key 5) [b]>[/b]metal pipe from exhaust (screwdriver)
- flexi pipe
- electric plug at bottom
- water bottle to be moved out of the way
next step is to remove the nut on top of the heater plug.
He uses a 10 socket and a small ratchet to unscrew the plugs.
hopefully i dont need that:
+++ Day 2: All went well. It took me 2 or 3 hours not counting in the time it took to find the tools (I havent got that many and they re all scattered + when I went to buy the extension for the ratchet the shop employee got the key stuck in the display's lock...). What I needed was slightly different than on the above video which is normal since my engine is on a LDV Pilot 2003 DW8 diesel non turbo. Tools used:
- DW40 lubricant
- short arm HEX wrench/Allen key 5 (not sure of the size though)
- medium or long arm HEX wrench/Allen key (bigger size but again I don't know exactly
- flat screwdriver pair of pliers
- socket 7mm
- deep socket 10mm (for plugs)
- ratchet
- ring offset spanner (or deep socket wrench) 8mm light
- set of new plugs...
First unscrew the Allen head bolts. These with long arm Allen wrench:
These with the short arm smaller hex wrench
Next unscrew the air intake pipe collar with the flat screw driver.
snap open the clip-on collar of the metal pipe from the exhaust using the screwdriver too.
If you disconnect these two you can already pull out the air intake manifold that covers the engine head and prevents access to the glow plugs.
Then you can start unpluging the flexi pipes (there are 2 of them) and the electric plug. They are located close-by the air intake connection.
You can see the plug here and the red labelled flexi pipe - connected beside each other. Right behind is the third flexi pipe which connects underneath.
The third flexi pipe.
Disconnect that bigger rubber pipe at the very back of the manifold (below the electrical ringed plastic pipes on the image) using the flat screwdriver. Pop it out like the pipe from the exhaust. Same clip-on collar type.
Lastly unscrew the bolt that hold these 2 electric wires right under that rubber pipe you just took off. Use the ring spanner or deep socket one 8mm for that job.
They are disconnected on the image.
Pull out the manifold and you can now access the plugs.
Get your 7mm socket and your ratchet + extension to undo the bolts that hold the wire (sometimes a metal plate) between the plugs.
Once undone pull out the wire and change the socket to the deep 10mm one so you can get cracking on the plugs. Go carefully cause it seems they can break easily. I had no probs at all but maybe it was due to the DW40 bath?
It's appropriate to clean around the plugs before you take them out or else just make sure nothing gets in their hole when taken out and when placing in the new ones. A reasonable amount of grease on the thread of the new ones is probably a good idea too.
The old ones on mine looked like that:
No wonder why the engine wouldn't start as soon as the temperature would go down...
Once you re done with the new ones, go all the way backwards:
- electric cables at the back
- rubber pipe at the back (bit of a pain to close the collar back - I used a pair of pliers)
- flexi pipes x 2 by the air intake connection
- electric plug by the air intake connection
- Main air intake pipe to the manifold - tight up the collar back
- Place the manifold where it should be
- Metal pipe from the exhaust (pain as well -I used a pair of pliers which crunched flesh off my fingers)
- Screw back the Allen bolts
that should tighten up everything.
If you did it correctly and hopefully this was just maintenance, the engine will start up right away as mine did.
Monday, November 25, 2013
LDV-sherpa forum - The Revival
Since the previous one went off line and much LDV van owners asked where it went and why, I set up the new ldvsherpauk forum.
Hopefully that'll be as helpful as the previous has been to me...
Sunday, September 8, 2013


Saturday, September 7, 2013
LDV Pilot workshop manual
I've ordered one and I'm going to make it digitally sharable.
Also I've LDV workshop manual for older vans than mine <2002/2003.
It's got files about the convoys, the XUD9 engine.
Also I've LDV workshop manual for older vans than mine <2002/2003.
It's got files about the convoys, the XUD9 engine.
Sunday, September 1, 2013
LDV Pilot van - Fixing the starter motor
Today I took it down.
Here are a few pics of the necessary tools and how it look slike + cable connections...
BEFORE YOU DO ANYTHING, DON'T FORGET TO UNPLUG THE CABLES FROM YOUR BATTERY (at least the Positive one +, red).
Also when working with electric parts some use glasses and gloves. Gloves are good when they fit just to protect skin from cuts and dirt.
Lastly if you need to work under the van like me, glasses are useful to avoid dirt in the eyes but also remember to hold parts as you unscrew them so they don't fall on your face in these enjoyable awkward positions we have to get into.


I opened the motor today and the brushes are worn (+ one spring sprang out and it'd take me hours to find it back) out so I'm
just gonna replace the whole part cause i've no time and no gear to
solder new ones on.
Although this mechano shows how to do it and I'll have to do it later so I can fix the motor and sell it or replace the used one I got and sell it.
Here are a few pics of the necessary tools and how it look slike + cable connections...
BEFORE YOU DO ANYTHING, DON'T FORGET TO UNPLUG THE CABLES FROM YOUR BATTERY (at least the Positive one +, red).
Also when working with electric parts some use glasses and gloves. Gloves are good when they fit just to protect skin from cuts and dirt.
Lastly if you need to work under the van like me, glasses are useful to avoid dirt in the eyes but also remember to hold parts as you unscrew them so they don't fall on your face in these enjoyable awkward positions we have to get into.
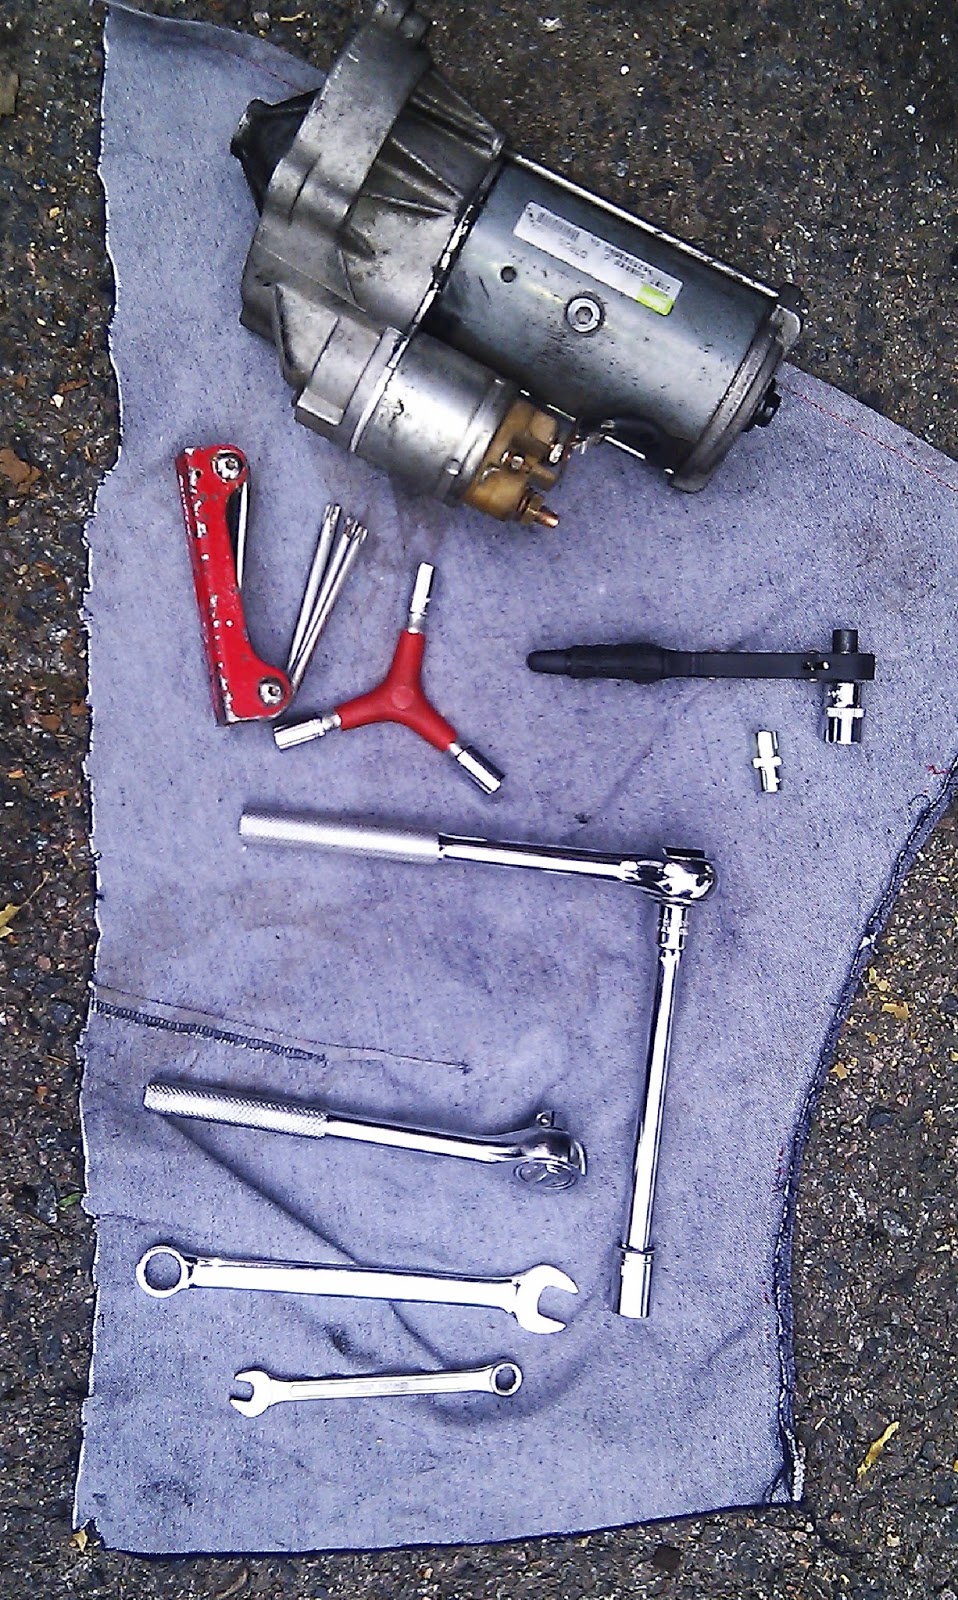
Tools you need


8 and 13 is all you need but in different shapes.


These are good once you are going to open the motor up.


Check your connection before you take them off and find a way to remember what they were.

There is only these 3 bolts to take off but they aren't all easy to get to.
That's when the extension comes in handy.


Solenoid

D7 R26 is the part number if you need to order a new/used one


Although this mechano shows how to do it and I'll have to do it later so I can fix the motor and sell it or replace the used one I got and sell it.
Then I tested and mounted the motor I purchased. The engine cranked up and off I went for 10 min. I parked and again, back to nothing but the click of the happy egoist solenoid. Unmounted and tested and remounted the motor, cleaned motor connections. The engine goes and stop and refuses to go again. nothing but solenoid. (30£ and time spent for nothing).
I started to think it's due to the ignition or some relay.
I took down the dashboard (I'm very curious).
I learned how to test 4 pins relays (testing relays post here) and did it to all since I couldn't find online which relay was the ignition switch one. I bought a new 5 pins relay thinking it was the defectuous one (and ignition one) cause there was water in it but wrong again and minus 15£ and time running around (Pilot parts aren't easy to find!) and time running out for the little moving job I needed to do.
Next day with a quieter mind. I wrote down all the stuff I knew worked, the stuff I knew didn't work, the stuff I needed to check to keep things clear and methodical.
1. The click noise means a healthy solenoid and enough current through the ignition and relay is working
2. Looked online and managed to read the wiring diagram of the van from a video advertising online (also bought the pilot workshop manual but it takes a few days to be delivered).
3.Ignition relay is the second one on the lower level on the passenger's side. It worked.
4. The main fuses (50Amp) are all fine.
5. went through this good video tutorial again to check if current is going through
6. Found that current wasn't going from battery positive knob to battery positive cable when plugged.
7. cleaned the cable proper, pushed in the bits that were sticking out.
The starter motor went spinning and the engine started!
Only one thing to say:
If you hear the solenoid click noise,
check your connections well with a voltmeter and a friend turning the key in the order shown in the video.
I'm thinking of putting that info in images and writing here in case that video goes down the utube plughole sometime.
Saturday, August 31, 2013
Posts on timing belt and DW8 engines... and french peugeot forums
Monday, March 11, 2013
Saturday, March 2, 2013
LDV Pilot van - under the snow


That wasn't its favourite season. Despite a lot of Pilot's owners who claim this van always starts up, mine found it difficult under cold and wet conditions. I changed the battery to a new one but it still had troubles. I guess it's got to do with the heads not heating up properly. Something in the electrics?
Needs to be investigated further...
Sunday, February 10, 2013
Saturday, February 9, 2013
DW8 engine euro 3 rating
The DW8 is for all intents and purposes an evolution of the XUD9 and is the only Diesel engine in the family not to feature a turbocharger or common-rail direct injection. It has a bore of 82.2 mm and a stroke of 88 mm for a displacement of 1868 cc. It is mainly used in vans such as the Citroën Berlingo and Peugeot Partner but can also be found in more affordable versions of the Peugeot 206 and 306. The DW8 was phased out in 2007 as it does not pass Euro IV emissions regulations (it is an Euro III engine[1]).
DW8
69 PS (68 hp/51 kW)
Dieselcatalyst
DW8 B
69 PS (72 hp/53 kW)
Dieselcatalyst
From http://en.m.wikipedia.org/wiki/PSA_EW/DW_engine#section_4
DW8 on 206
read more - images

From http://en.m.wikipedia.org/wiki/PSA_EW/DW_engine#section_4
DW8 on 206
read more - images

Subscribe to:
Posts (Atom)