Showing posts with label parts. Show all posts

Tuesday, July 7, 2015

Engine epihany and anatomy with a very instructive video on the basic of engines parts

Recently I'm having an epiphany. I am starting to understand how engines works (it's about time).

That's thanks to a lot of hours reading, listening and watching as well as keeping my nails dirty.
It's not like I have a choice; I got two engines (diesel and petrol) and no money to pay for a mechanic and do my Qigong routine each morning to nurture my self-confidence and solution finding mindset as opposed to giving in to despair and disproportionate amount of colourful language.
This formula seems to work with lots of advice and guidance from anywhere I can get.

Now I am re-watching the video below from Eric the car guy (who's on that big online social network) and it's making sense (!). I can feel the shifts in my brains when I hear camshaft and timing belt. Enough about my godly revelation, here is the video:


(Thanks for all the work you put in doing these videos Eric.)

Monday, September 22, 2014

A list of 39 caravan breakers, new and used parts in UK.

I found this great list of caravan breakers and used parts in UK in a post on caravanningnow.co.uk by Richard Cole (many thanks).
There is also a very good page with many caravan related links, check it out!

"a non-profit making site that provides all sorts of information about caravanning, for both experienced and new caravanners, in what I hope is a simple and straightforward manner." (Richard Cole - creator of caravanningnow.co.uk)

Thursday, December 19, 2013

Online LDV used parts shop

Thought I'd put this on here... not that I earn anything from it but could prove handy.
LDVANS

Monday, November 25, 2013

LDV-sherpa forum - The Revival


Since the previous one went off line and much LDV van owners asked where it went and why, I set up the new ldvsherpauk forum.
Hopefully that'll be as helpful as the previous has been to me...

Saturday, September 7, 2013

How car engine works - parts

glow plug
Some diesel engines contain a glow plug. When a diesel engine is cold, the compression process may not raise the air to a high enough temperature to ignite the fuel. The glow plug is an electrically heated wire (think of the hot wires you see in a toaster) that heats the combustion chambers and raises the air temperature when the engine is cold so that the engine can start.
source: howstuffworks.com
Glow plugs are used to heat the combustion chambers of some diesel engines in cold conditions to help ignition at coldstart. In the tip of the glow plug is a coil of a resistive wire or a filament which heats up when electricity is connected.
source: 4engines.blogspot.co.uk

the “one-minute of silence.” 

 Fuel pump
A fuel pump is a frequently (but not always) essential component on a car or other internal combustion engined device. Many engines (older motorcycle engines in particular) do not require any fuel pump at all, requiring only gravity to feed fuel from the fuel tank through a line or hose to the engine. But in non-gravity feed designs, fuel has to be pumped from the fuel tank to the engine and delivered under low pressure to the carburetor or under high pressure to the fuel injection system.
source: wikipedia


Distributor
A distributor is a device in the ignition system of an internal combustion engine that routes high voltage from the ignition coil to the spark plugs in the correct firing order.
source: Wikipedia

Carburator
a device that blends air and fuel for an internal combustion engine.
source: Wikipedia 

 Read more from howstuffworks.com

Read about classic cars carbs

What does a carburetor do?

The carburetor has several functions: 1) it combines gasoline and air creating a highly combustible mixture, 2) it regulates the ratio of air and fuel, and 3) it controls the engine's speed.

How a carburetor mixes fuel and air

When the piston moves down the cylinder on the intake stroke it draws air from the cylinder and intake manifold. A vacuum is created that draws air from the carburetor. The airflow through the carburetor causes fuel to be drawn from the carburetor through the intake manifold past the intake valves and into the cylinder. The amount of fuel mixed into the air to obtain the required air to fuel ratio is controlled by the venturi or choke. When air flows through the venturi its speed increases and the pressure drops. This causes the fuel to be sucked into the air stream from a hole or jet. When the engine is at idle or at rapid acceleration there is not enough air passing through the venturi to draw fuel. To overcome these problems other systems are used.

Delivering gasoline to the carburetor

Gasoline is delivered to the carburetor by the fuel pump and is stored in the fuel bowl. To keep this level of fuel stored in the bowl constant under all conditions a float system is used. A float operated needle valve and seat at the fuel inlet is used to control the fuel level in the bowl. If the fuel level drops below a certain level the float lowers and opens the valve letting more fuel in. When the float rises it pushes the inlet valve against the seat and shuts off the flow of fuel into the bowl.
 

Controlling the speed of the engine

The throttle controls the speed of the engine by controlling the amount of air fuel allowed in the engine. The throttle is a butterfly valve located after the venturi and is opened by pressing on the gas pedal. The farther the valve is opened the more air/fuel mixture is let into the engine and the faster the engine runs. At low engine speeds when the throttle is only open a little there is not enough air flow to pull in fuel.

Ports

Two ports are used to solve this problem. One port located in the low pressure area and the idle port located below. At low engine speeds both ports draw fuel to keep the engine running. As engine speed increases fuel from the 2 ports decreases until it stops completely.

Handling low speeds

When the engine is idle there is very little air flowing through the venturi because the throttle valve is closed. The idle port allows the engine to operate under this condition. Fuel is forced through the idle port because of a pressure differential between air in the fuel bowl and vacuum below the throttle valve. Idle fuel mixture is controlled by an adjustable needle valve.

Handling high speeds

At higher engine speeds more fuel is drawn from the main nozzle. Fuel comes from the fuel bowl through the fuel nozzle and into the throat of the carburetor where it mixes with air.

Types of carburetors

There are 3 basic types of carburetors in use today. They are the one barrel, two barrel, and four barrel. Typically, the type of engine and its use will dictate which carburetor is used. In high performance engines multiple carburetors may be used to deliver the amount of fuel required. No matter what type of carburetor your engine uses, National Carburetors is your source for high quality carburetors. source: nationalcarburetors.com

LDV Pilot workshop manual

I've ordered one and I'm going to make it digitally sharable.
Also I've  LDV workshop manual for older vans than mine <2002/2003.
It's got files about the convoys, the XUD9 engine.

Thursday, April 11, 2013

Welding metal

Slightly off topic although a good skill to have when you own a van or any vehicle. Even a bike. And you are good enough with your hands.

Good FORUM:  http://weldingweb.com

wiki How-to > helpful read to chose the correct electrodes

A rare trade with info on how to weld aluminium correctly.

Loads here on all type of welding

videos

videos on metal and welding (Arc and MIG)

DIY welding for punks

on equipment

uk welder forum

gasless MIG

Extract from wiki 18 steps
(warning from my instructor: "never weld without protection gear on."):

Learn the steps for creating a successful weld. Welding is more than dragging a welding rod across a piece of steel and gluing it to another one. The process begins with properly fitting and securing the work pieces, or metal to be welded, together. For thicker pieces, you may want to grind a bevel so subsequent beads can be placed in the groove to fill it completely with a solid weld. Here are the basic steps for completing a simple weld.
  • Strike the arc. This is the process of creating an electric arc between the electrode and the workpiece. If the electrode simply allows the current to pass directly into the grounded work piece, there will not be enough heat produced to melt and fuse metal together.
  • Move the arc to create a bead. The bead is the metal from the melting electrode flowing together with molten metal from the base metal to fill the space between the pieces being joined by welding.
  • Shape the weld bead. This is done by weaving the arc back and forth across the weld path either in a zig zag or figure 8 motion so the metal spreads to the width that you want your finished weld bead to be.
  • Chip and brush the weld between passes. Each time you complete a pass, or trip from one end to the other of your weld, you need to remove the slag, or the melted electrode flux material, from the surface of the weld bead so only clean molten metal will be filling the weld on the subsequent pass.
http://alec.tamu.edu/LinkClick.aspx?fileticket=Y67TTX05uzY%3D&tabid=625

LDV vans spare parts

Looking for a spare mirror and few bits and bobs I went to a spare parts and repair workshop/scrap yard in Charlton-Woolwich but the (helpful) man said he hasn't seen a Pilot in a year and only had one new mirror for sale. I went to buy second hand and the new one was over my budget unfortunately.

Pilots are becoming scarce it seems.
Here is a page with a list of dealers branded LDV in UK. I think it's worth ringing them up before paying a visit.

If you happen to read this post and you know of other ones or you went to one of those on the list,
please give us details and/or feedback in a comment.

Cheers.
Here is a sample to which I'm adding two I know that are not mentioned on the list.

Best place so far and according to many dealers

online

Transit & LDV Van Parts

116 Westmoor Street
Charlton
London
SE7 8NQ

F J Keen & Son - LDV Van Centre

143-145 Battersea Park Road, Battersea
London, SW8 4BX

Dealers

>> LDV Van Dealers in the London Region are:

Double Drive Exclusive Limited
Dealer Location: London, London
Tel: 0208 965 8600  0208 965 7329
Website: www.usedvans4sale.com

Service 

Heathrow LDV Limited t/a Heathrow Van Centre
Dealer Location: London, Middlesex
Tel: 020 8897 2348  020 8897 2346
Website: www.heathrowldv.com

Sales  Service  Parts  VANfit

Morgan Elliott Croydon
Dealer Location: Croydon, Surrey
Tel: 020 8683 6200  020 8683 4023
Website: www.croydonldv.com

Sales  Parts  VANfit

West London LDV
Dealer Location: London, Greater London
Tel: 020 8481 8000  020 8481 8007
Website: www.usedvans4sale.com

Tuesday, March 12, 2013

LDV Pilot rear wheel drum and hub: changing the wheel cylinder

Ok -

This is just some basic information on how I changed the rear wheel cylinder on a 2003 Pilot - I think most cylinders in most vehicles operate the same - I watched a few video's and saw various methods and fixings - here's what I found...

BTW - there is a way to do this without taking the shoes out - but I was going to change the shoes anyway.

Stuff I needed:
Research:
http://www.youtube.com/watch?v=p8k5GfTpZr4&list=PLD3_GkY1HOeh76Y-OeWRSKgRwUZUWQ8pB&index=2 << shows the basics, LDV Pilot is a slightly different fixing on the cylinder.
http://www.youtube.com/watch?v=g4HqLoDjVRA << bit slow but shows basic start to process

- Brake cleaner (spray) brake fluid EVERYWHERE> this really helped
- phillips screwdriver for drum retainer screw
- Pliers for spring removal
- axel stands x2 (and chocks for the front wheels)
- spanner (11?) to loosen the pipe fixing to the back of cylinder
- spanner for (8/10) loosening the bleed nipple
- new wheel cylinder, possibly brake shoes if they are soaked compromised through the brake fluid
- bleeding kit / bottle and pipe (see here at 5:37: http://youtu.be/V5O_pbC8R2E?t=5m37s )

1. Loosen the wheel nuts on the offending wheel, Chock the front wheels, jack up, stick the stands under the rear axel, one each side.
2. Take the wheel nuts off, then the wheel, then the handbrake.
3. Spin the drum - it should turn freely
4. find the retainer screw, take it out
The retainer screw half out of the drum
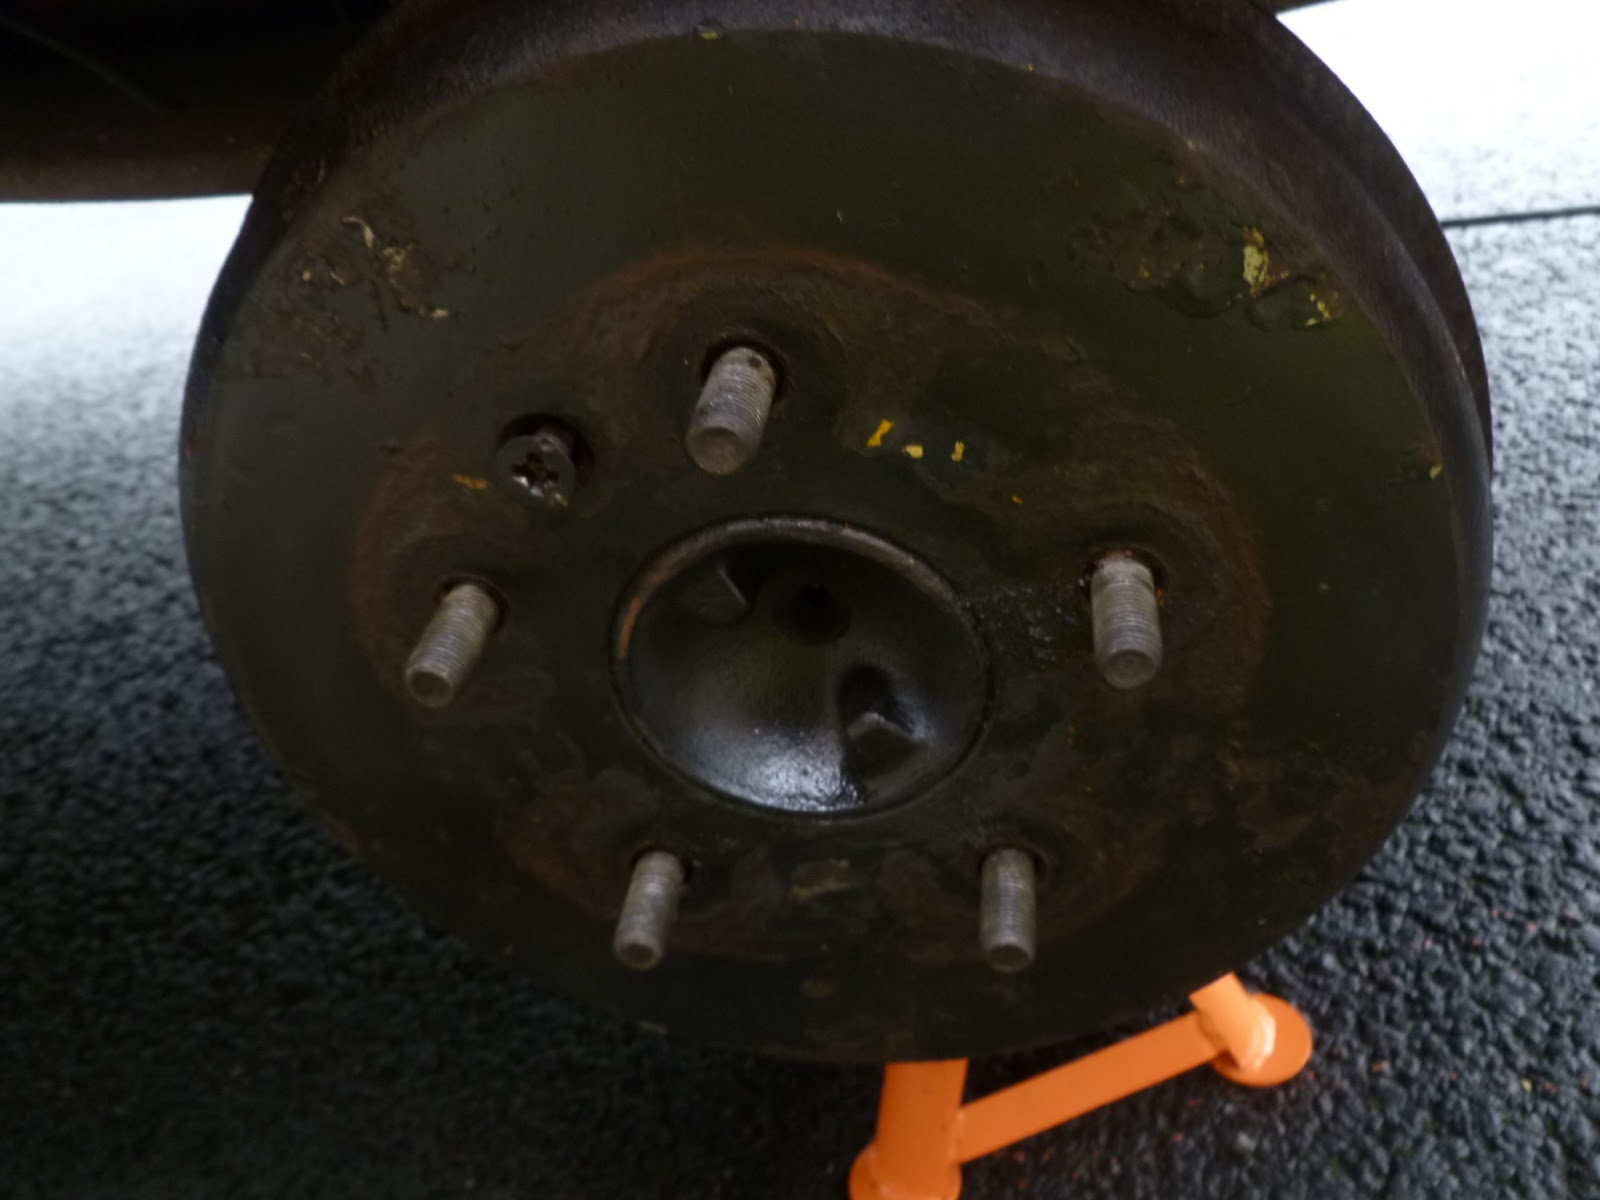
5. Either the drum slides off (not very likely) or you have to just keep hitting the drum with a hammer and turning it... it will eventually crack and begin to come off... like so;

Under the drum... this sight awaits...

6. Basically, I tool the springs out of their holes with a pair of pliers on my leatherman (thanks Ludo) but you can use long nose pliers or something else suitable... I didn't do it in any particular order, but laid the springs between the new shoes to note what went where...


 7. The handbrake is attached to the base of the right brake shoe - simply pull the metal outer cable spring back to expose the cable and slip from the fixture

handbrake cable end location 
8. With the cable and shoes removed, you can start taking the cylinder off> undo the brake pipe nut from the back of the cylinder- there will be some brake fluid leak from the pipe, you can find a way to stop the leak, such as the rubber cap for the bleed nipple.


9. Get the circlip off; slide the old cylinder away from the hub.

 10. Clean up the hub with brake cleaner, then time to fit the new cylinder; get the circlip on first as the pipe screws in easy.

New cylinder pipe and circlip on
 11. Thats the cylinder done really!

 12. Use some copper grease (I only had lithium here) just where the shoes rub on the hub to help prevent squealing - some on the back of the drum also (no pic) so its less likely to be a sod to get off the next time...


13. Get your shoes on!

14. Bleed the brakes (see video above in 'research')

As you can see here, I gave the old shoes a good clean, a brief very very fine sand, as I couldn't work out how to get this handbrake fixture off on of the shoes:


Its the next job:::

Hope this helps - let me know any questions/ advice!

Saturday, March 2, 2013

LDV Pilot van - UK regulations

Bills paid.
Road tax duty stamp at £215.00.
MOT coming up in March.

I need to fix the defectuous rear bumper which fell this morning as I lightly hit a tree while manoeuvring. Had to fix it for ages now really have to do it.
The fan belt still haven't been changed (!)
need a new extra tyre.
Need to fix the rear light better then the gaffer tape the previous owner fixed it with.

Need a look into the electrics for start up troubles.
And do the imminent address change.

Finally I'd love to take the time to properly seal the body for water leak and carry on with rust treatment as well as body repair (very appealing job for a sculptor like I).
Pics later.

Friday, February 8, 2013

LDV Pilot van - spare, Replacement Key

http://www.autolocksmithstockport.co.uk/cars/ldv
http://www.bancroftlocksmiths.co.uk/

LDV - random knowledge on common faults and more

Help! I have an ex Post Office LDV Pilot with an immobiliser.

kingpins!!!!!!! new or pack with grease

History

LDV

LDV is a famous UK van manufacturer, located in the Drews lane area of Wolseley, Birmingham, England. It was a part of the British Leyland/Rover Group empire and was the latter's Freight Rover arm of the Land Rover Group division. It was officially known as LDV Limited after its merger with Leyland Trucks and DAF Trucks in 1987. The company manufactures various panel vans, pick-ups and minibuses. These vehicles are available with various modifications and specifications. The Convoy and Pilot panel vans were amongst the first modified versions of Leyland DAF 400 Series of vehicles. They were produced between 1997 and 2006. The convoy was available as 2.8 tonne, 3.1 tonne and 3.5 tonne variants with load volume capacities of up to 12.9 cubic metres. The pilot was made available in capacities ranging from 2.2 to 2.6 tonnes in a 5.7 cubic metre load area. Both these vans were immensely popular as a minibus and would come as pick-up and fleet based vans. These vans were replaced by an LDV van, the Maxus. Maxus van was launched in 2005 and was awarded the Professional Van and Light Truck Magazine ''Van of the Year 2005'' title. It is available in two wheelbases, three roof heights and a choice of 2.8t, 3.2t and 3.5t GVW. It is being used on fleet basis by companies such as Transco, Royal Mail and various UK police services. The company had also produced a small van named LDV Cub that was produced from 1996 until 2001. It was popular with small businesses such as plumbers, gardeners and electricians. The company also provides services and insurance for LDV Maxus and other LDV cars. 

Big Brother Maxus:
http://dudleyinvestigatesldv.wordpress.com/

(on LDV Pilot vans) "Rads block, if they overheat it normally wrecks the cylinder head, Rad fan switches fail, kingpins wear out quickly, shock bushes are always wearing out, steering boxes wear and leak, gearboxes can give problems with crunchy gears etc, diff seals leak, wiper linkages wear out and leak water into cab and your forever banging your elbow on the door."


Saturday, September 8, 2012

LDV Pilot Van - logbook

I offered to help carry a friend's giant puppets for a Latin American festival with the van last sunday. All went well until on the way back, my (only) key got stuck in the side door's lock. I managed to get it out but the lock is not functioning with the key anymore. I need to open it from the inside.
Not a big deal. It's more worrying that I only have one key for this van.

LDV Pilot Break down number 1- logbook

About a week ago, there was a heavy load in the back and the alternator belt and water pump belt snapped as I was driving.
The engine kept running and pulling the van so I could drive to a parking place.
Luckily it wasn't the timing belt but without those belts the cam/timing belt could get damages too.
With friends' help the belts were replaced. I was sold the wrong alternator belt but although it is too short it did the job (It doesn't fit the diagram and misses going around one of the tensioner but the tension is good). I'm not totally sure the water pump belt is the correct one either but it works.

I still have to find the right alternator belt, replace it with the right tension and I need to check the timing belt before any long distance trip.

Saturday, August 11, 2012

LDV Pilot van Parts - What does it look like? - Post 1

Power steering pump, Starter motor, Water pump...
More to come.
If you are wondering what they do, check out this site which explains how engines work.

Power steering pump for LDV pilot van

Starter motor for LDV pilot van
 
Starter motor for LDV pilot van


Starter motor for LDV pilot van

Water pump for LDV pilot van

LDV Pilot engine drawing


Timing belt on LDV Pilot vans and other belts


Along with a blown head gasket or an engine block seizure, a broken timing belt sounds like worries and costly repairs. So to avoid this to happen, unless your vehicle has a camchain (which you never need replaceing), make sure to check and replace your cambelt/timing belt in due time.

Unless your car is a vintage model, the engine most likely has a serpentine belt drive.
On many engines, a serpentine belt powers several accessories such as the air conditioner compressor, water and power steering pumps, fan, and even the booster for the braking system.
It's definitely worth having the serpentine drive belt system checked periodically.  If it fails, the engine will overheat, and worse, the car won't run.
The situation could leave you stranded on a highway or busy metropolitan street waiting for a costly tow to a local repair shop.
Listen for signs of impending belt failure.  A squealing noise when the car accelerates means the belt is slipping and is not efficiently turning the drive accessories.  The belt tensioner also could be worn and in need of immediate replacement.
Look for excessive cracks in the belt’s V-ribs, and chunks that have broken off the ribs.
However, visual appearance is not a reliable indicator of the expected service life of a belt.  It is recommended to replace the serpentine belt every four years.

how to fix squealing that is coming from the serpentine belt

"A serpentine belt, also known as a multi-vee, poly-v, or multi-rib belt, is a single, continuous belt used to drive multiple peripheral devices in an automotive engine, such as an alternator, power steering pump, water pump, air conditioning compressor, air pump, etc."

"Definition: A type of flat rubber drive belt that is used to turn multiple accessories on the front of an engine. It is called a serpentine belt because of the way it snakes around the various pulleys. Many vehicles now have a single serpentine drive belt because it eliminates the need for several separate V-belts. A spring-loaded pulley maintains tension on the serpentine belt. This does away with the need to retension the belt when it is replaced. Serpentine belts generally last 25% to 50% longer than conventional V-belts."

How to change a serpentine belt article.

V-belt

Types of belts


LDV Pilot van timing-belt


Kingpins on LDV Pilot van

Don't forget to look after the kingpins on your LDV Pilot van.
They need regular greasing.


A thread on replacing kinpins from the Total -ldv-sherpa forum

(exert: "I bought a pair of new king pin kits off of Ebay for £47.80 delivered - don't try to do them on the van it's not worth wasting your time - Remove the front axle - an easy job, think of it like a meccano set!! this was the procedure I used.

Jack the van under the centre of the front axle
Support the body on both sides using the chassis rail under the doors and lower the weight of the van onto the supports. - Leave the jack in place for now.
Remove both front road wheels
Remove both front caliper to hub bolts and tie the calipers up out of the way - dont let them 'dangle' on their hydralic pipes.
Undo the hubnuts and remove the discs and bearings.
Disconnect the steering joints on the hubs - 2 on the drivers side and one on the Passenger.
Withdraw the steering bar that connects the two wheels together.
Remove the U Bolts which hold the axle to the springs (2 each side)
Lower the Jack and the axle will drop with it.

Now you have the axle off you can either find a friendly engineering firm or garage that has a press or as I did invest in a press that I had always promised myself (SHOP PRESS 20 TON NEW £141.99 inc delivery)

Or just buy an exchange 'off the shelf' reconditoned unit

The only 'minor' difficulty is setting the shims when reassembling - but I can advise on that if you need it. ")