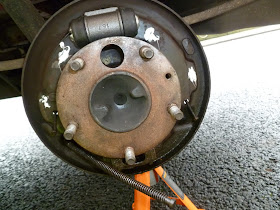
This is just some basic information on how I changed the rear wheel cylinder on a 2003 Pilot - I think most cylinders in most vehicles operate the same - I watched a few video's and saw various methods and fixings - here's what I found...
BTW - there is a way to do this without taking the shoes out - but I was going to change the shoes anyway.
Stuff I needed:
Research:
http://www.youtube.com/watch?v=p8k5GfTpZr4&list=PLD3_GkY1HOeh76Y-OeWRSKgRwUZUWQ8pB&index=2 << shows the basics, LDV Pilot is a slightly different fixing on the cylinder.
http://www.youtube.com/watch?v=g4HqLoDjVRA << bit slow but shows basic start to process
- Brake cleaner (spray) brake fluid EVERYWHERE> this really helped
- phillips screwdriver for drum retainer screw
- Pliers for spring removal
- axel stands x2 (and chocks for the front wheels)
- spanner (11?) to loosen the pipe fixing to the back of cylinder
- spanner for (8/10) loosening the bleed nipple
- new wheel cylinder, possibly brake shoes if they are soaked compromised through the brake fluid
- bleeding kit / bottle and pipe (see here at 5:37: http://youtu.be/V5O_pbC8R2E?t=5m37s )
1. Loosen the wheel nuts on the offending wheel, Chock the front wheels, jack up, stick the stands under the rear axel, one each side.
2. Take the wheel nuts off, then the wheel, then the handbrake.
3. Spin the drum - it should turn freely
4. find the retainer screw, take it out
 |
| The retainer screw half out of the drum |
 |
| Under the drum... this sight awaits... |
6. Basically, I tool the springs out of their holes with a pair of pliers on my leatherman (thanks Ludo) but you can use long nose pliers or something else suitable... I didn't do it in any particular order, but laid the springs between the new shoes to note what went where...
7. The handbrake is attached to the base of the right brake shoe - simply pull the metal outer cable spring back to expose the cable and slip from the fixture
 |
| handbrake cable end location |
8. With the cable and shoes removed, you can start taking the cylinder off> undo the brake pipe nut from the back of the cylinder- there will be some brake fluid leak from the pipe, you can find a way to stop the leak, such as the rubber cap for the bleed nipple.

9. Get the circlip off; slide the old cylinder away from the hub.
10. Clean up the hub with brake cleaner, then time to fit the new cylinder; get the circlip on first as the pipe screws in easy.
 |
| New cylinder pipe and circlip on |
13. Get your shoes on!
As you can see here, I gave the old shoes a good clean, a brief very very fine sand, as I couldn't work out how to get this handbrake fixture off on of the shoes:
Its the next job:::
Hope this helps - let me know any questions/ advice!


